Installation
The following installation steps will guide you through compiling Keysas from sources and installing it on a Debian 12 (Bookworm) system.
Software dependencies
To compile Keysas from sources, let’s start by installing the required dependencies:
Dependencies installation
$ sudo echo "deb http://deb.debian.org/debian bookworm-backports main contrib non-free" > /etc/apt/sources.list.d/backports.list
$ sudo apt update
$ apt -qy install -y libyara-dev libyara9 wget cmake make \
                     lsb-release software-properties-common \
                     libseccomp-dev clamav-daemon clamav-freshclam \
                     pkg-config git acl rsync bash libudev-dev \
                     libwebkit2gtk-4.0-dev build-essential curl \
                     wget libssl-dev apparmor ssh libgtk-3-dev \
                     libayatana-appindicator3-dev librsvg2-dev

# Install rustup
$ curl --proto '=https' --tlsv1.2 -sSf https://sh.rustup.rs | sh

# Install the LLVM toolchain
$ bash -c "$(wget -O - https://apt.llvm.org/llvm.sh)"

# Install the nightly rust toolchain
$ curl https://sh.rustup.rs -sSf | sh -s -- --default-toolchain nightly -y
$ rustup default nightly
Getting Keysas
A pre-compiled Keysas binary is at your disposal. We recommend using the latest version here: https://github.com/r3dlight/keysas/releases
- Download the following files of lastest stable version.
keysas-vx.y.z.zip
keysas-vx.y.z.zip.sha256
keysas-vx.y.z.zip.sig
First, verify the sha256sum and compare it to the keysas-vx.y.z.zip.sha256 file, and import our public gpg key:
$ diff <(sha256sum keysas-vx.y.z.zip) keysas-vx.y.z.zip.sha256
$ wget https://keysas.fr/download/public.gpg
$ gpg2 --import public.gpg
$ gpg2 --verify keysas-vx.y.z.zip.sig keysas-vx.y.z.zip
$ unzip keysas-vx.y.z.zip -d keysas
Warning
Ensure that /usr/sbin is present in your $PATH. If not, add it:
$ export PATH=$PATH:/usr/sbin
For a source based installation
Clone the gitlab repository and compile Keysas
$ git clone --depth=1 https://github.com/r3dlight/keysas.git
$ cd keysas
$ make build
Clamav configuration
Keysas uses Clamav as a virus scanner for now but additionnal scanners could be added in future. You should update your Clamav signature database on regular bases. This operation is handled by the clamav-freshclam daemon, you have to enable it.
Make sure that your clamav-daemon and clamav-freshclam services are up and running
$ systemctl status clamav-daemon clamav-freshclam
Edit the Clamav configuration
Enable TCP listening on the loopback interface using port 3310
#/etc/clamav/clamd.conf
TCPSocket 3310
TCPAddr 127.0.0.1
Warning
Make sure that the StreamMaxLength (clamd.conf) parameter is consistent with MAX_SIZE and YARA_MAXFILESIZE (see keysas-transit).
We now need to allow the Clamav daemon to be able to read the /var/local/in directory with Apparmor.
Clamav apparmor profile tweak
The following Clamav apparmor rules are used to authorise Clamd scanning the entry SAS:
#/etc/apparmor.d/local/usr.sbin.clamd
/var/local/in/ r,
/var/local/in/* kr,
/var/local/in/** kr,
It should be automatically installed during installation.
You can now manually run a signature database update and restart the Clamav daemon to take the new configurations in account.
$ sudo systemctl start clamav-freshclam
$ sudo systemctl restart clamav-daemon
System wide installation
You can now install Keysas-core on your system.
$ cd keysas
$ sudo make install-core
$ sudo make install-yararules
To install the Full USB version of Keysas (decontamination station):
$ cd keysas
$ sudo make install
$ sudo make install-yararules
At the end of the installation, you should see something like this:
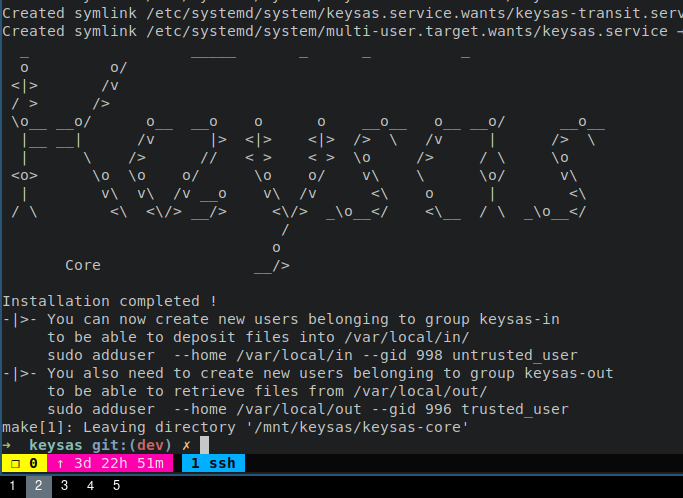
Installation details
Every binaries (ELF) are installed under /usr/bin/ ;
Systemd units are installed under /etc/systemd/system/ ;
Apparmor profiles are installed under /etc/apparmor.d/ ;
Configuration files are installed under /etc/keysas/ ;
Logs are available using journalctl ;
Yara rules are installed under /usr/share/keysas/rules.
You can now check that every services are up and running (core mode):
$ systemctl status keysas keysas-in keysas-transit keysas-out
If you want to check the full installation (USB mode):
$ systemctl status keysas keysas-in keysas-transit keysas-out keysas-io keysas-backend
Building Keysas-frontend
Keysas-frontend is a read-only Vue-JS application to help visualizing transfers for the end-user.
Go to the keysas-frontend directory and install the dependencies using npm:
$ npm i
One done, you can build the application:
$ npm run build
The application is now built into the dist directory. Copy the content of this directory at the root of a local webserver (like nginx for exemple). Open now a web browser like firefox and visit the http://127.0.0.1
Building Keysas-admin
Keysas-admin needs to be signed by our personal private key. Nevertheless, if you want to build it yourself for testing purposes:
$ cd keysas-admin && npm i vite@latest && cargo install cargo-cli && cargo tauri build
Warning
Keysas-admin only work on GNU/Linux based systems for now !